Connect an Agent to Microsoft Teams
A Microsoft Teams trigger connects a deployed agent to Microsoft Teams so people in your organization can chat with it in a personal Teams chat. Replies stream back into the chat as the agent produces them, and the agent receives the message sender’s verified email address, so it can identify the user.
The setup spans three systems: the Microsoft Teams Developer Portal hosts the bot and the Teams app, the Azure portal holds the bot’s authentication settings and permissions, and Agentic Data Plane holds the agent’s trigger.
After reading this page, you will be able to:
-
Register a Microsoft Teams bot and configure its Azure app registration for single-tenant access
-
Add a Microsoft Teams trigger to an agent and copy its messaging endpoint
-
Publish the bot to your organization and verify the agent responds in a Teams chat
Prerequisites
-
A deployed agent. If you don’t have one, see Create an Agent.
-
Microsoft Entra admin access for your organization. Granting API permission consent and approving the Teams app require an admin.
-
Access to the Teams Developer Portal and the Teams admin center.
|
Microsoft and Redpanda each need a value from the other: Redpanda needs the bot credentials before it can show the messaging endpoint URL, and the bot needs that URL to finish its setup. In this guide, you create the bot first without an endpoint, add the trigger in Redpanda to get the URL, and then return to Microsoft to finish. The Microsoft steps refer to a third-party product. Specific UI elements may not be up to date. For current instructions, see the Microsoft Teams Developer Portal documentation. |
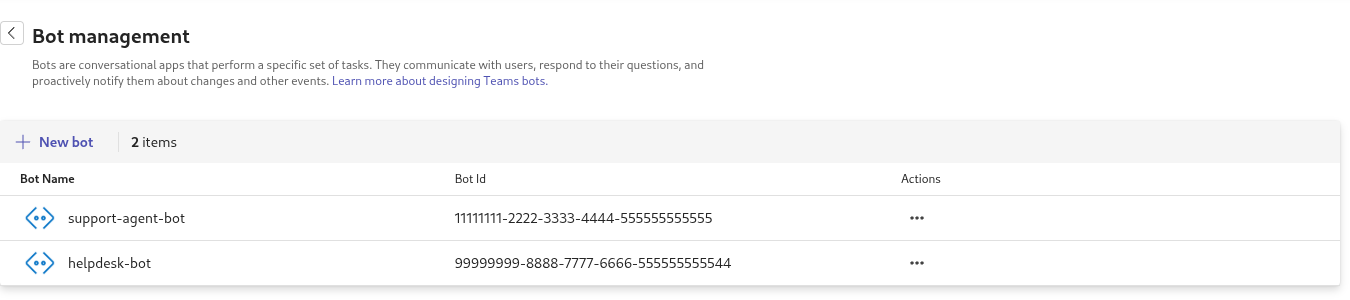
Create a bot in the Teams Developer Portal
-
Go to the Teams Developer Portal and open Tools > Bot management.
-
Click New bot, enter a name, and create it.
-
Leave the endpoint address blank for now. You get the URL from Redpanda later.
Generate a client secret
In the bot’s settings:
-
Click Client secrets.
-
Click New client secret.
-
Copy the generated secret value and store it securely. The value is shown only when you create it.
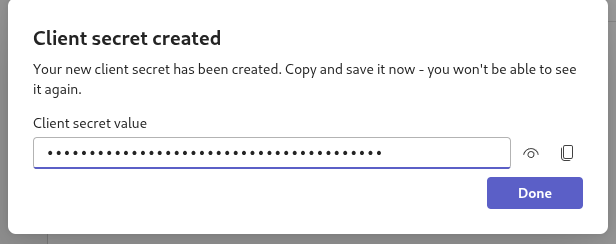
You now have two values from the Teams side: the bot ID, shown in the bot list, and the client secret you just generated. The bot ID and the application (client) ID of the bot’s app registration are the same value.
|
If you can’t create another client secret in the Teams Developer Portal, open the bot’s app registration in the Azure portal and create one under Certificates & secrets instead. |
Configure the app registration in Azure
Creating a bot in the Teams Developer Portal also creates a matching app registration in Microsoft Entra. Adjust its settings.
Find the app registration
-
In the Azure portal, search for App registrations.
-
Open the Owned applications tab and select your bot’s app registration.
-
On the Overview page, note the application (client) ID and the directory (tenant) ID. You need both when you add the trigger.

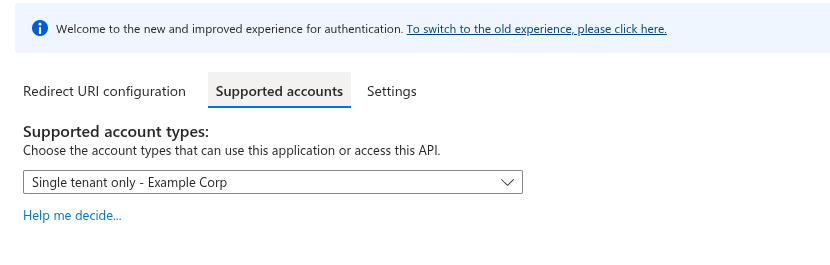
Set the account type to single-tenant
|
The app registration must be single-tenant. A multi-tenant configuration causes 401 authorization errors on every inbound message. If the bot stops responding after setup, check this first. Changes can take up to 60 minutes to propagate. |
-
In the app registration, open Authentication.
-
On the Supported accounts tab, select the single-tenant option for the supported account types. Depending on the portal experience, it is labeled Single tenant only or Accounts in this organizational directory only.
-
Save.
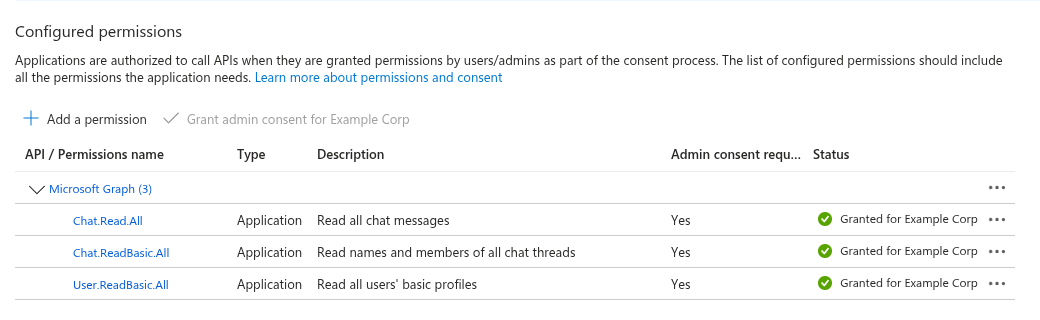
Add Microsoft Graph permissions
The trigger uses the bot’s own credentials to look up the message sender’s email address in Microsoft Graph and passes it to the agent as the user identity. This lookup runs as a background service, so it requires application permissions, not delegated permissions.
-
In the app registration, open API permissions.
-
Click Add a permission and select Microsoft Graph.
-
Select Application permissions.
-
Add each of these permissions:
Permission Purpose User.ReadBasic.AllResolve the sender’s email address from their Microsoft Entra object ID.
Chat.Read.AllRead chat messages, as required by Teams.
Chat.ReadBasic.AllRead chat metadata, as required by Teams.
-
Click Grant admin consent. The button includes your organization’s name. The status of each permission changes from Not granted to Granted.
Granting admin consent requires a Microsoft Entra admin role, such as Global Administrator or Privileged Role Administrator. If the button is unavailable, ask an admin to grant consent.
Add the Microsoft Teams trigger to your agent
-
Open your agent’s Triggers tab.
-
Click Add trigger and select Microsoft Teams.
-
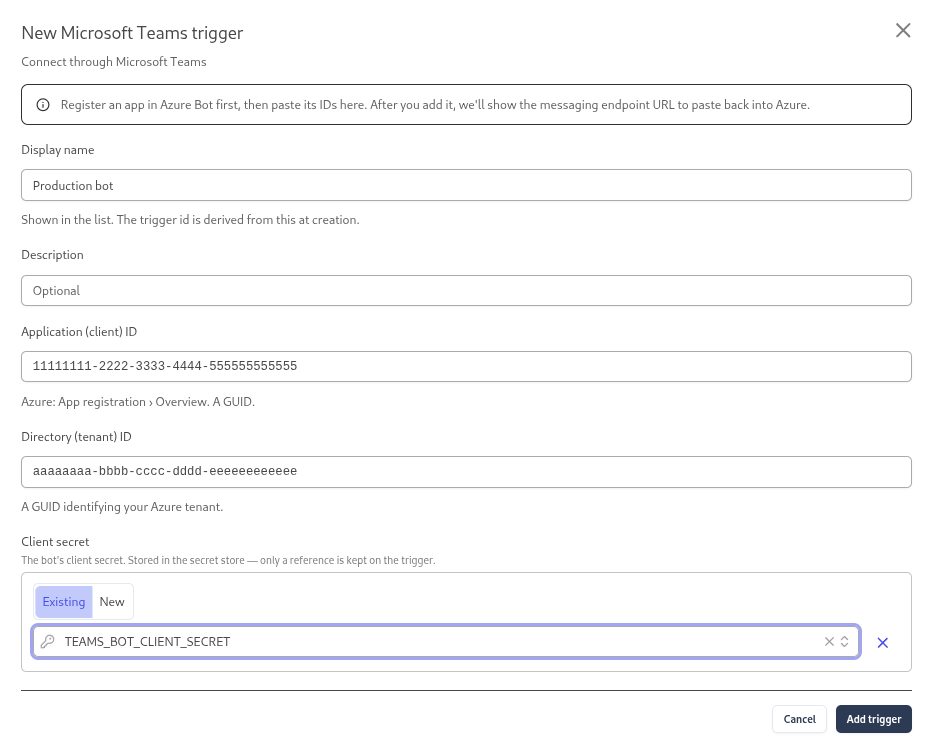
Fill in the trigger configuration:
Field Value Display name
A name for this trigger, for example,
Production bot. The trigger’s unique ID is derived from it at creation and can’t be changed afterward.Application (client) ID
The application (client) ID from the app registration Overview page.
Directory (tenant) ID
The directory (tenant) ID from the app registration Overview page.
Client secret
A reference to a secret in the secret store that holds the client secret you generated. Select Existing to pick one, or New to name the secret, paste the value, and click Create secret. Only the reference is kept on the trigger.
-
Click Add trigger. A confirmation panel explains the remaining setup.
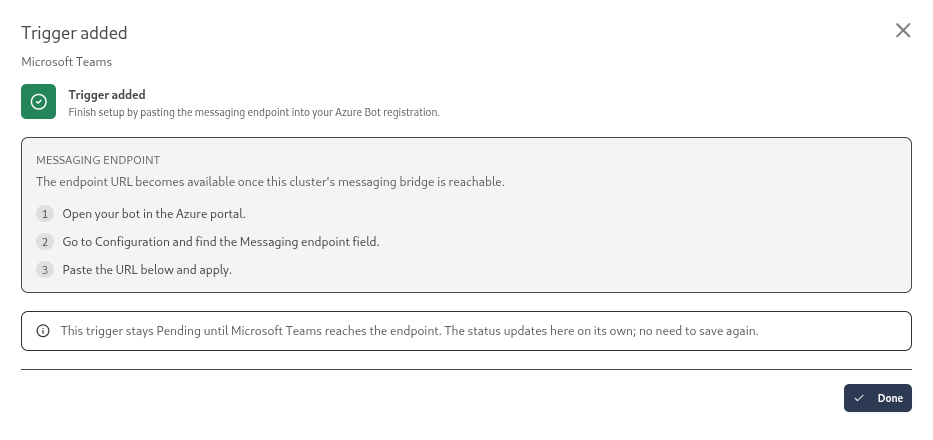
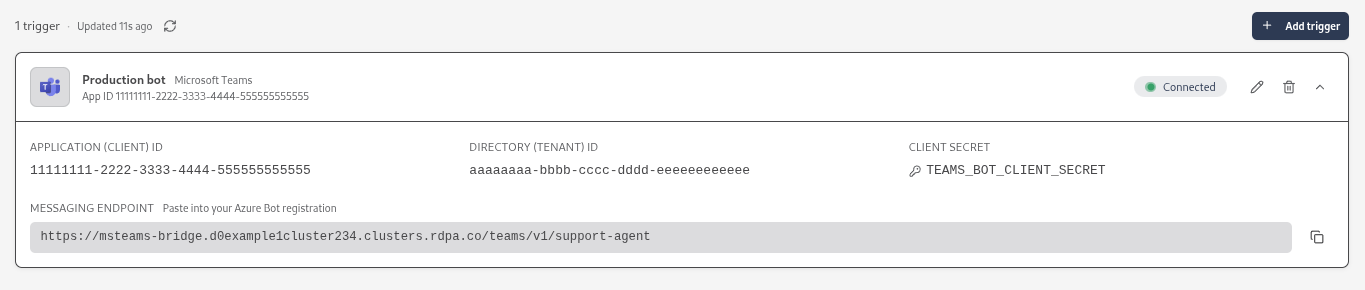
Copy the messaging endpoint
Redpanda’s messaging bridge picks up the new trigger, validates the bot credentials with Microsoft, and reports the trigger’s messaging endpoint URL. This takes up to a minute, and the Triggers tab refreshes on its own.
-
On the Triggers tab, expand the trigger’s card.
-
Wait for the status to change from Pending to Connected. The Messaging endpoint field then shows the URL, similar to:
https://msteams-bridge.<cluster-id>.clusters.rdpa.co/teams/v1/<agent-id>In this URL,
<cluster-id>is the ID of the cluster the agent runs on, and<agent-id>is the agent’s ID. -
Copy the URL exactly as shown. You need it in the next step.
If the status changes to Error instead, the message on the card explains the reason. See Troubleshooting.
Set the endpoint URL on the bot
-
Go back to the Teams Developer Portal.
-
Open Tools > Bot management and select your bot.
-
Paste the messaging endpoint URL into the endpoint address field.
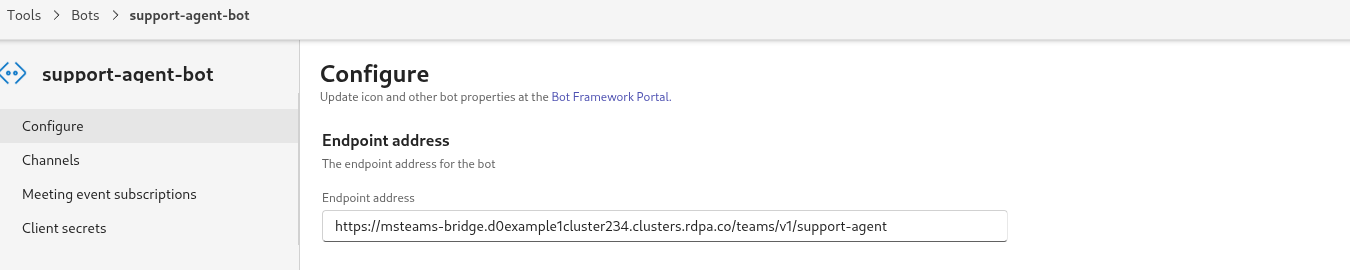
-
Save.
If you manage the bot as an Azure Bot resource instead, paste the URL into the Messaging endpoint field on the bot’s Configuration page in the Azure portal.
Create and publish the Teams app
A Teams app makes the bot visible to people in your organization.
-
In the Teams Developer Portal, click Apps, and then create a new app and give it a name.
-
On the Basic information tab, fill in the descriptions, developer information, and the application (client) ID from the app registration.
-
Open App features, select Bot, and choose the bot you created. Under the scopes where people can use the bot, select Personal. With only this scope selected, people use the bot in personal chats and can’t add it to channels or group chats, which matches what the trigger is designed for.
-
Click Publish > Publish to your org. This submits the app for admin approval.
Approve the app in the Teams admin center
-
Go to the Teams admin center.
-
Open Teams apps > Manage apps and search for your app.
-
Select the app, then click Publish to approve it.
The app can take up to 24 hours to appear in the Teams app catalog after approval.
|
By default, the app is available to everyone in the organization. To restrict it, assign it to specific users or groups under Manage apps. To pin it to the Teams sidebar, add it to a setup policy under Setup policies. |
Verify
-
Open the agent’s Triggers tab and confirm the trigger status is Connected. This confirms that Redpanda validated the bot credentials with Microsoft. It does not confirm that the endpoint URL is set correctly on the bot, so also send a real message.
-
In Microsoft Teams, find the app in your chats and send it a message. While the agent works, Teams shows a progress indicator, and then the reply streams into the chat with an AI-generated label. Tool calls appear as cards that update in place as they finish.
How a message flows
When someone messages the bot, Teams delivers the message to the trigger’s messaging endpoint. Redpanda’s messaging bridge authenticates the request against the trigger’s bot credentials, resolves the sender’s email address through Microsoft Graph, and forwards the message to the agent along with that identity. The reply streams back into the chat as the agent produces it. A reply that exceeds the Teams streaming limits finishes as a regular message.
An agent can have several Microsoft Teams triggers, each with its own bot registration and credentials. For example, you can expose one agent through a production bot and a test bot at the same time. Inbound messages are matched to the trigger whose bot they were addressed to.
Each trigger’s health is rechecked continuously: about every 30 seconds, the bridge validates the trigger’s credentials with Microsoft and updates the status on the Triggers tab. If a client secret expires or is rotated to a wrong value, the trigger flips to Error with the reason, without anyone sending a message.
Troubleshooting
| Symptom | What to check |
|---|---|
The bot never responds, or replies with a 401 error |
The app registration is most likely set to multi-tenant. In the Azure portal, open the app registration, click Authentication, and select the single-tenant option for the supported account types. Allow up to 60 minutes for the change to propagate. |
The trigger shows Error with a message that the client secret is not set in the secret store |
The messaging bridge could not read the secret from this cluster’s secret store. In Secrets Store, confirm that a secret exists whose ID exactly matches the reference on the trigger. If it does and the error persists, contact Redpanda support. |
The trigger shows Error with a message that Microsoft rejected the bot credentials |
The application (client) ID, directory (tenant) ID, and client secret don’t match a valid app registration. The Microsoft error code in the message names the exact cause. For example, |
Teams shows a Permissions needed message |
A Teams admin has not yet approved the app. Approve it in the Teams admin center. |
The Grant admin consent button is unavailable |
The signed-in Azure user lacks admin privileges. Ask a Global Administrator to grant consent on the API permissions page. |
The agent responds but doesn’t receive the sender’s email address |
The |
The trigger status stays on Pending |
The messaging bridge has not reported on the trigger yet. The first report normally arrives within a minute. If it doesn’t, refresh the tab; if the status still doesn’t change, contact Redpanda support. |
