Create an Agentic Data Plane Environment
Create a Redpanda Agentic Data Plane environment to build and govern agents in your Amazon Web Services (AWS) account or Google Cloud Platform (GCP) project through BYOC.
After reading this page, you will be able to:
-
Configure an environment’s cloud provider, region, and network access
-
Provision the environment with the generated
rpkcommand -
Verify readiness and open the environment
Prerequisites
-
A Redpanda Cloud organization with a plan that includes Agentic Data Plane for your chosen cloud provider. The organization needs available quota for Agentic Data Plane environments, BYOC networks, and BYOC cores. Contact Redpanda Support to confirm access and quotas or request higher limits.
-
Permission to create clusters in the resource group you select. If you don’t have it, ask your organization administrator to grant it.
-
rpkinstalled on the machine where you run the apply command. -
Credentials for the target AWS account or GCP project, with permission to provision BYOC infrastructure. Ask your cloud administrator to prepare this access. For credential setup, see the AWS credential configuration or Google Cloud authentication documentation. Redpanda Cloud authentication does not replace these cloud-provider credentials.
-
An IPv4 CIDR block that does not overlap any network you plan to connect to the environment. Review CIDR range guidelines.
-
If you plan to choose
Privateaccess, a network path from your computer to the environment’s virtual private cloud (VPC), such as a VPN, VPC peering, AWS PrivateLink, or Google Cloud Private Service Connect. Without one, you can’t open the environment in the Agentic Data Plane UI or userpk aiagainst it. Plan the connection before you create the environment.
Configure the environment
The Cloud UI records your settings. You then run an rpk command to start provisioning in your cloud account.
-
Sign in to the Redpanda Cloud UI and select the organization where you want to create the environment.
-
In the navigation menu, click Agentic Data Planes, then click Create Agentic Data Plane.
-
In the Details section, configure these fields:
Field What to enter NameA name unique within your organization, such as
example-environment. Use one to 63 lowercase letters, numbers, or hyphens. Start with a letter and end with a letter or number.Resource groupSelect a resource group where you have permission to create clusters, or confirm the preselected group if one is shown.
Cloud providerAWSorGoogle Cloud. The form offers only providers included in your organization’s plan.RegionAn available region in your selected cloud provider.
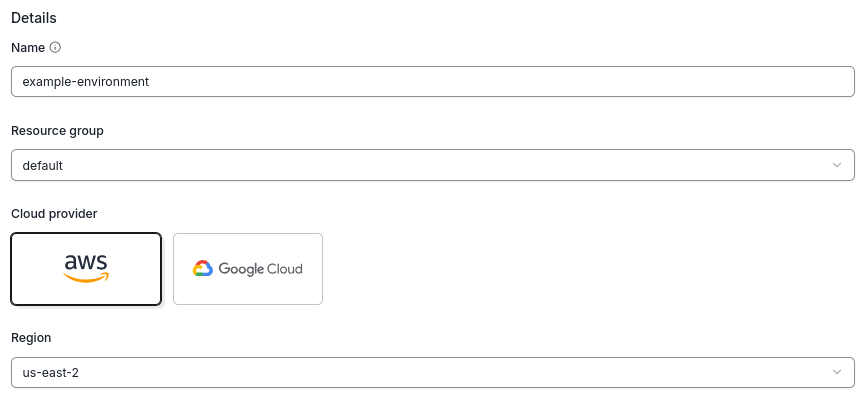 Figure 1. The creation form with example AWS settings
 -
In the Networking section, choose
API gateway access:-
Public(default): The Agentic Data Plane UI andrpk aican reach the environment from the internet. Authentication and authorization apply. -
Private: The Agentic Data Plane UI andrpk aican reach the environment only from networks connected to the VPC.Privatemeans private. From any computer that isn’t connected to the environment’s VPC through a VPN, VPC peering, AWS PrivateLink, or Google Cloud Private Service Connect, the Agentic Data Plane UI at ai.redpanda.com can’t load the environment andrpk aicommands against it time out. Signing in to ai.redpanda.com and selecting the environment still work from anywhere. Everything after that needs the private network connection. ChoosePrivateonly if that connection is in place, or planned, for everyone who will use the environment.You choose this setting when you create the environment. To change it later, an administrator edits
API gateway accesson the environment’s Dataplane settings page in the Redpanda Cloud UI. This option isn’t available to every organization, so choose carefully.
-
-
Set
Redpanda Network IP CIDR block. The default is10.0.0.0/16. Use an RFC 1918 private IPv4 network range with a prefix length from/16to/20on AWS, or/16to/19on GCP. The range must not overlap networks connected to the VPC. -
If you selected
AWSandPrivateaccess and the form showsEgress Transit Gateway ID (optional), leave it empty to use the default NAT gateway path. To use an existing AWS Transit Gateway for outbound traffic instead, enter its ID.The Transit Gateway must be in the same AWS account and region, accept VPC attachments, and have hub routes that do not overlap the environment’s CIDR block. This optional field is available only for organizations with Transit Gateway egress enabled. It does not configure client access to the environment.
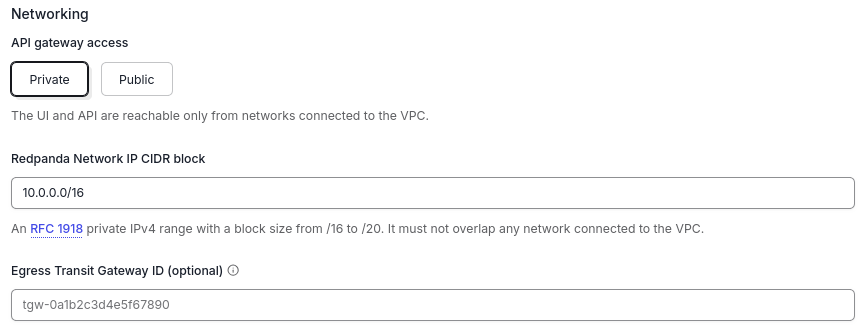 Figure 2. AWS networking settings with private access selected and the optional egress field available
 -
Click Create Agentic Data Plane.
-
Wait for
Stateto showApply requiredon the environment’s detail page. Creating the entry in the Cloud UI does not provision the environment by itself.
Apply the configuration
Run the generated command from a terminal with the cloud-provider credentials prepared in the prerequisites.
-
Sign in to the same Redpanda Cloud organization you used in the Cloud UI:
rpk cloud loginFor authentication options, see rpk cloud login.
-
On the environment’s detail page, find the Apply command section. If you selected
Google Cloud, enter your target project ID inGCP project IDto enable Copy command. -
Click Copy command and run the copied command in your terminal. The Cloud UI fills in the environment ID. The commands have these forms:
AWSrpk cloud byoc aws apply --redpanda-id <environment-id>Google Cloudrpk cloud byoc gcp apply --redpanda-id <environment-id> --project-id '<project-id>'<environment-id>is the environment’sIDon the detail page.<project-id>is the GCP project where you want to provision it. Use the generated command rather than copying these placeholders unchanged. -
Wait for the command to complete successfully. If it fails, resolve the reported error before continuing. Redpanda Cloud then provisions the infrastructure and installs the services. The environment shows
Creatingwhile provisioning continues.
Verify and open the environment
-
Return to the environment’s detail page and wait for
Stateto showReady. -
Confirm that the Endpoints section lists
AI Gateway URLandAPI URL. -
If you selected
Privateaccess, connect your computer to the environment’s VPC first. From a browser outside that network, ai.redpanda.com can’t load the environment and instead asks you to connect to your private environment. -
Click Open and confirm that the Agentic Data Plane UI loads for your environment. The Open button appears when the environment is
Ready.
Troubleshooting
| Symptom | Action |
|---|---|
The navigation menu has no Agentic Data Planes entry, or the page shows |
Confirm that you selected the intended organization. Contact Redpanda Support to check that its plan includes Agentic Data Plane for your cloud provider. |
The page shows |
Read the accompanying message. Creation may not be enabled, or the organization may have reached its limit. Contact Redpanda Support to enable creation or raise the limit. |
Create Agentic Data Plane is disabled. |
Complete the required fields and resolve validation errors. If the page reports a loading error, use its retry control. Confirm that you have permission to create clusters in the selected resource group. Ask your organization administrator to grant access if needed. |
The creation form shows |
Keep the form open and submit the same values again without reloading the page. Creation may still be in progress. Submitting unchanged values from the same form reuses the original request rather than allocating a duplicate. |
The page shows |
On the creation form, click Retry. On the environment’s detail page, click Retry progress. These controls retry the progress lookup without allocating another environment. If progress remains unavailable, contact Redpanda Support with the environment name and its ID if available. |
The creation form shows |
Read the accompanying message and resolve any reported name or Transit Gateway conflict. For other allocation errors, contact Redpanda Support with the environment name and region, and ask them to check the organization’s Agentic Data Plane, BYOC network, and BYOC core quotas. |
The environment remains in |
Run the command from its Apply command section with credentials for the target cloud account. Check the terminal output for errors. If it reports that the agent token is not provisioned yet, wait briefly and retry the same command. |
The environment remains in |
Allow provisioning to finish. If the state does not progress to |
The environment shows |
Contact Redpanda Support with the environment ID and the error shown. Cloud resources may remain after failed provisioning. Do not assume the failure removed them. |
The environment is |
Your computer isn’t on a network connected to the environment’s VPC. Connect through your organization’s VPN, VPC peering, or private endpoint service, then click Reload page in ai.redpanda.com or rerun the |
Next steps
-
Agentic Data Plane Quickstart for Administrators: Configure a large language model (LLM) provider and grant your builders access.
-
Agentic Data Plane Learning Path: Follow the ordered path from platform concepts to production integration.
